Rename Figma layers with an AI agent
This tutorial shows how to let Claude Code or Codex give the layers of one Figma frame clear, consistent names, so that “Frame 12” and “Rectangle 4” become names such as Header, Price and Divider. The agent shows you the new names first and changes them only after your yes, in the file you have open in the Figma desktop app on your Mac.
What you will do
You will copy one skill, open the FigmaMCP plugin in your file and name one frame. The agent reads its layers, proposes a naming map, renames each layer after you agree and reads the frame again to confirm. Clean names help designers, developers and code-generation agents find things, so this is a good step before a handoff or before you generate code from a frame.
How the agent picks a name
The agent follows the rule you give it. With no rule, the skill uses these defaults.
| Layer | Named after | Examples |
|---|---|---|
| Text | What it is, not what it says, unless it is a fixed label such as a button’s Sign in | Title, Price, Error message |
| Frame or group | Its role | Header, Product card, Actions |
| Shape | Its purpose | Divider, Avatar background |
Steps
Set up FigmaMCP
Install the FigmaMCP Mac app and connect Claude Code or Codex. If you have not done this yet, follow the tutorial Edit a Figma file with Claude Code in 5 minutes first.
Setup is the same for every task. See Edit a Figma file with Claude Code in 5 minutes or Figma MCP setup for Mac.
Copy the figma-rename-layers skill
Copy the
skills/figma-rename-layersfolder from the FigmaMCP releases page into~/.claude/skills/for Claude Code, or~/.codex/skills/for Codex. Then start a new agent session.A skill is a short instruction file that tells the agent which tools to call, in which order. The FigmaMCP app installs only the base
figmamcpskill, so you copy this one yourself. Get it from skills/figma-rename-layers.Open the plugin and check the switch
Open the file in the Figma desktop app, then choose Plugins, Development, FigmaMCP. Make sure the AI can edit this file switch is on. If it is off, every rename is refused with
READ_ONLY_MODEand the agent stops.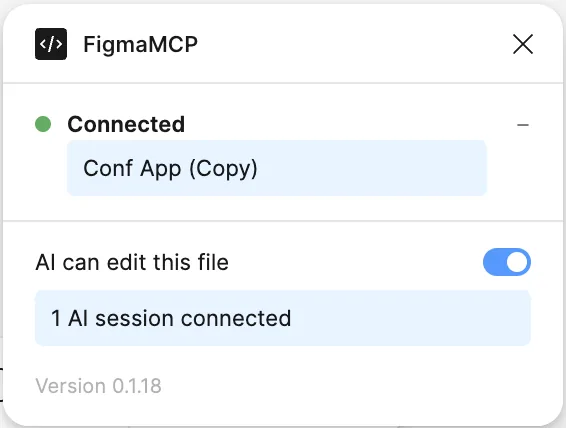
The FigmaMCP panel in Figma. With the switch off, the agent can only read. Name the frame and the naming rule
Name the frame, or paste a Figma link to it. Say the naming rule you want, for example Section / Element, kebab-case or Title Case, and ask to see the list before any change.
For example: “Rename the layers in the Pricing card frame on Page 1 so a developer can read them. Use short role names in Title Case. Show me the list before you change anything.”
Let the agent read the layers
The agent reads the layer tree of the frame with
node_info, including the content of each text layer, which is the best clue to its name. On a very large frame, it works section by section.Reading changes nothing in the file.
Check the naming map and say yes
The agent shows a table of current names and new names, and waits for your yes before it writes. It keeps names that are already clear, and it skips locked layers and the inner layers of component instances.
If the role of a layer is not clear, the agent asks you, or keeps the old name and lists it.
Let it rename one layer at a time
For each row, the agent calls
node_renamewith the current name of the layer, copied exactly as it read it. There is no batch rename. If the name does not match, because someone changed the file after the read, the call is refused and the agent reads that layer again.Two layers with the same name, such as two called Text, are told apart by their layer ID. A locked layer, or a layer the plugin refuses for another reason, comes back as Operation Denied; the agent reports that message and continues with the rest.
Check the result
The agent reads the frame again, compares it with the map and reports what it renamed, what it skipped and why. If the run stopped partway, this read shows where it stopped, and the agent continues from there.
The skill’s worked example
The skill includes this example for the Pricing card prompt in step 4. It is an example written in the skill, not a recorded run. The agent is expected to show a map like this one:
| Current name | New name |
|---|---|
| Frame 3 | Header |
| Text | Plan Name |
| Text | Price |
| Rectangle 2 | Divider |
| Frame 4 | Feature List |
After your yes, it makes one node_rename call per row, reads the frame again and reports a summary such as 5 renamed, 0 skipped.
What the agent will not do
- It changes only layer names. It does not move, resize, restyle or delete anything.
- It does not rename pages, styles, variables or component properties.
- It does not guess when the role of a layer is unclear.
- It does not edit locked layers.
Notes
- macOS only for now, and the Figma desktop app is required.
- Other changes to many layers at once, such as replacing text, are covered in Bulk edit Figma layers.
- Naming is one of the six categories in a design QA pass.
- FigmaMCP is not affiliated with or endorsed by Figma, Inc.
Next: turn a written spec into Figma frames, design to code, all tutorials, or all tools.
Last updated:
